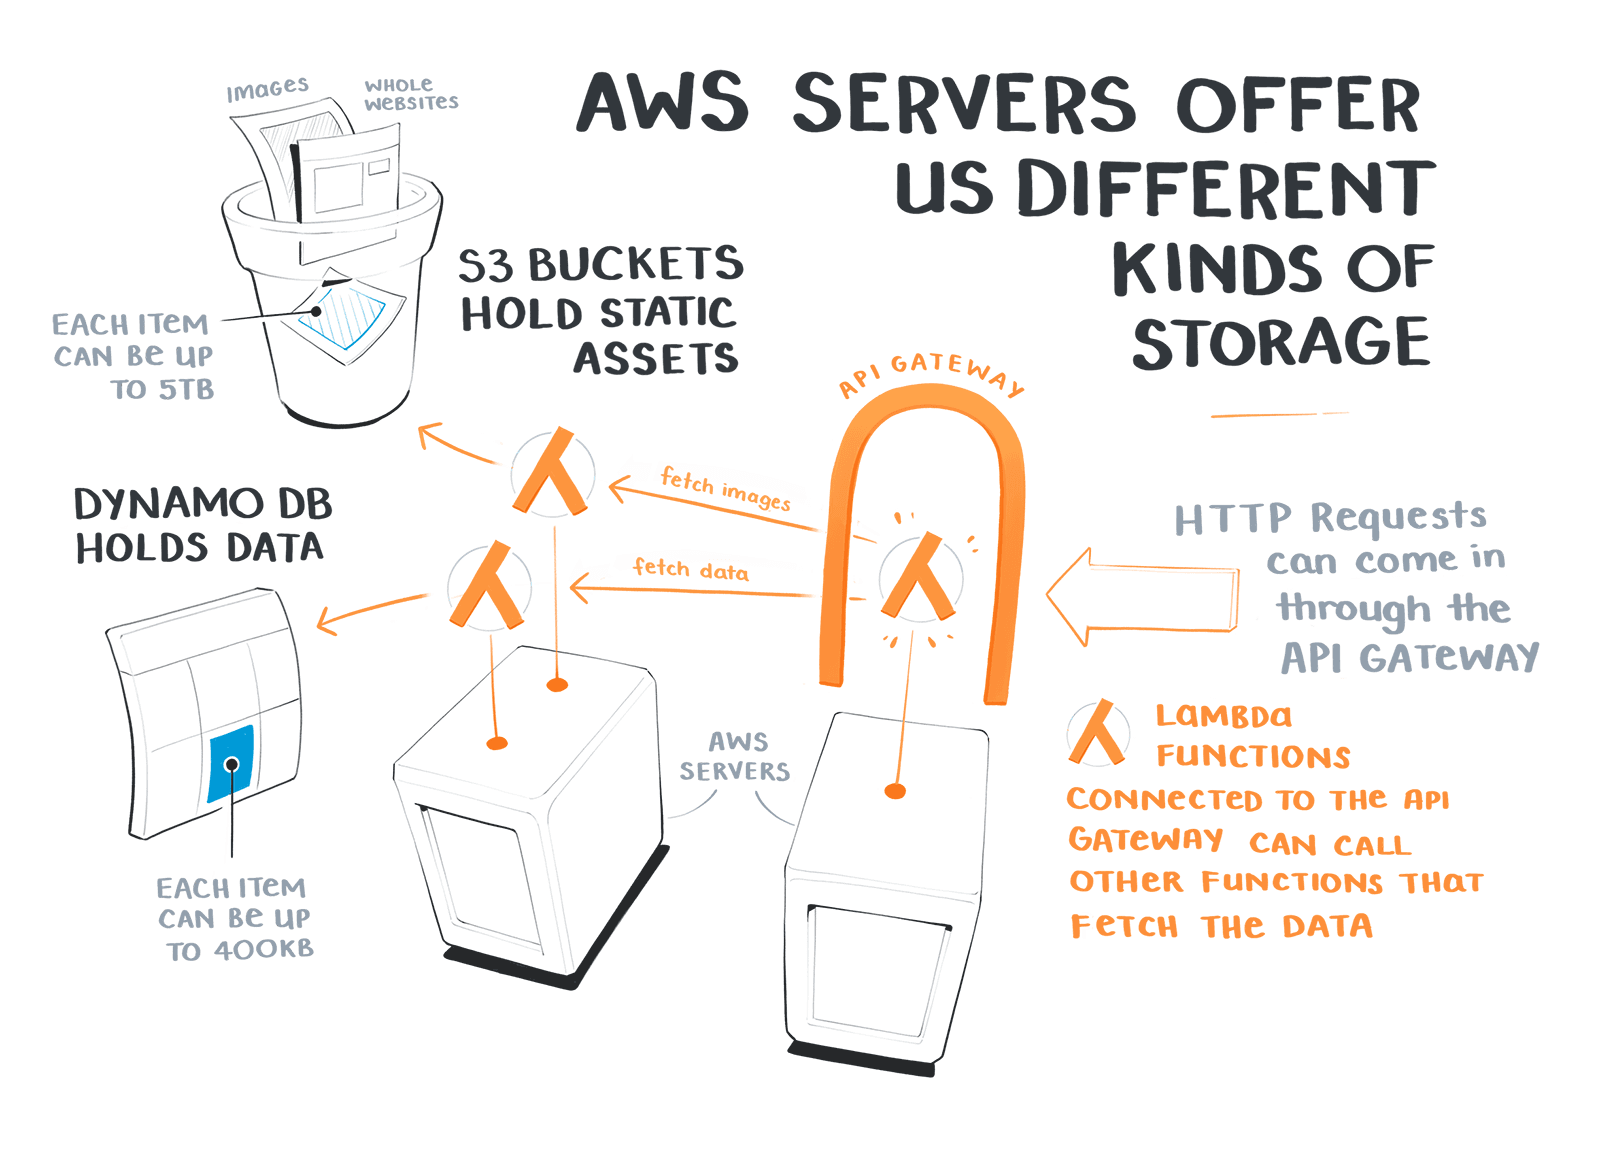
Let's hook our app to a database. We'll be using DynamoDB, which is a NoSQL database.
🤔 Side note: What is NoSQL?
NoSQL allows you to add any kind of data in your database because it is flexible. So we don't have to design a precise schema in advance, we can just start adding our data.
Run:
- npm install --save @aws-cdk/aws-dynamodb
Import dynamodb to our backend then create a new dynamo db table.
// save it as a const since we'll use it in a little bitconst todosTable = new dynamodb.Table(this, "TodoTable", {//a unique keypartitionKey: { name: "id", type: dynamodb.AttributeType.STRING }});
👍 Once deployed, you can find the dynamodb resources in the aws console (Services - CloudFormattion - TodoAppStack).
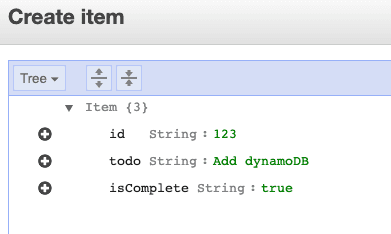
Let's add an item to the table: click on the Items tab, then Create item.
Add an id then append to String items:
id: String: 123todo String: Add DynamoDBisComplete: true
Get all items from a DynamoDB table deployed with CDK using DocumentClient API
Let's create a new lambda function that is going to be responsible for reading, creating, and deleting data in our database.
🤔 A handy dynamodb cheatsheet.
👍 Create todoHandler.ts (we can also delete the other hello lambda function since we just used it for testing).
import AWS = require("aws-sdk");// the table name that we get from an env variableconst tableName = process.env.TABLE_NAME || "";// for interacting with dynamoDB from JavaScript / nodeJSconst dynamo = new AWS.DynamoDB.DocumentClient();const createResponse = (body: string | AWS.DynamoDB.DocumentClient.ItemList,statusCode = 200) => {return {statusCode,body: JSON.stringify(body, null, 2)};};// DynamoDB Scan operation scans and returns all of the items in the dbconst getAllTodos = async () => {const scanResult = await dynamo.scan({TableName: tableName}).promise();return scanResult;};// async function that response to apiGateway eventsexports.handler = async function(event: AWSLambda.APIGatewayEvent) {try {const { httpMethod, body: requestBody } = event;// GET requestif (httpMethod === "GET") {const response = await getAllTodos();return createResponse(response.Items || []);}return createResponse(`We only accept GET requests for now, not ${httpMethod}`,500);} catch (error) {console.log(error);return createResponse(error, 500);}};
We'll have to make some changes to our todo-backend file. Let's make a new lambda function:
import * as lambda from "@aws-cdk/aws-lambda";
// use this instead of const, you'll see why in a momentthis.handler = new lambda.Function(this, "TodoHandler", {code: lambda.Code.fromAsset("lambda"),// the name of the method in your code that lambda will call// our file is called `todoHandler.ts` and it `exports.handler`handler: "todoHandler.handler",runtime: lambda.Runtime.NODEJS_12_X,// we need to pass the name of our table as env variableenvironment: {TABLE_NAME: todosTable.tableName}});
Debug permission issues and allow a lambda function to access data from a DynamoDB table
Let's deploy our changes and test the new lambda function.
A successful deploy will output a url (mine looks like this: https://6olvq234234.execute-api.eu-central-1.amazonaws.com/prod/).
Unfortunately, if you curl that url (or paste it into your web browser), you'll discover the following error:
- AccessDeniedException
To debug this, let's go to the aws console and look for our lambda function (under resources in Cloudformation).
Click Monitoring and View Cloud logs, then click on the latest log stream. You should find an error like this:
- is not authorized to perform: dynamodb:Scan on resource:
👍 By default, aws follows the principle of the least privilege, so we'll have to add some permissions.
We need this line of code to our lambda:
- todosTable.grantReadWriteData(this.handler);
Test if the fix worked, by curl-ing the outputted url. It should return your todos.